J
Jennifer
Guest
- Thread Author
- #1
Our huge two story wooden deck was neglected for years before we purchased our house. Almost all of the stain had worn off and the wood was splintered and severely weathered. We were able to save it with the help of RockSolid 20X Deck Resurfacer.

The deck was in such bad shape that we never wanted to hang out back there. Our big, beautiful backyard was one of the main reasons we purchased our home, so we knew putting time and effort into remodeling the deck was important to us.
Thank you to my friends at Rustolem for sponsoring this post. I was talking to them at a blogging conference and they told me about these products and I knew they were the perfect fit for our old, sad deck.
If you are in a similar situation, let me walk you through the process of restoring an old deck.
Step 1: Repair any rotted or broken wood. We had to completely replace our stairs because the stringers were broken.

We also replaced several deck boards and a few of the side pieces that were rotted through. Our deck used to house a hot tub and had a little wind break fence around where the hot tub was placed. We decided to take it down to open up the whole space. You can see a bit of the old partition left in this photo:

Step 2: Power wash the deck. We sprayed in between deck boards first, then went back across the tops of the boards. I was shocked at what a difference power washing made. Suddenly our deck didn’t seem nearly as old. Look at the difference:

I also thought this was the most fun part of this project. Power washing is oddly satisfying.

Step 3: Scrub the entire deck with RockSolid Deck and Patio Cleaner.

Mix the cleaner with water in a Home Depot bucket (the directions are on the package), then pour the solution across the deck and use an outdoor push broom to scrub the solution into the wood. Rinse with clean water.

Step 4: Once the wood is dry, spray all of the exposed nail heads with Zinsser Primer to protect them from rusting. This only works because the top coat is opaque, so the white primer will disappear later. Obviously you wouldn’t want to do this if you’re using a semi-transparent stain.

Step 5: Coat the deck with Deck Start Wood Primer. This product works with any solid top coat and simplifies prep work because you don’t have to strip off the old stain. This is a crucial step to promoting top coat adhesion, so don’t skip it! Also, just a funny little side note. This stuff reminded me so much of school glue. It goes on white and dries clear and it even kind of smells like school glue!

Step 6: Apply RockSolid 20X Deck Resurfacer to horizontal surfaces. This special coating is designed to fill in cracks in the wood and seal in splinters. It is VERY THICK… like “really good milkshake” thick.
We chose the color “Brownstone” which is a nice greige color. If I were to do it again, I would have picked “Winchester” which is basically the same tone, but a few shades darker. This is just a personal preference… I think the higher contrast would have looked sharp on our particular house. You can see a whole list of the available color options on the Rustoleum website.

Here are some things you need to know about applying 20X Deck Resurfacer:
We chose to spray our deck railing with a high quality exterior latex paint and my trusty paint sprayer because we knew that brushing on the paint would have taken FOR-EV-ER. It was the best choice we made in this entire project. Not only did it save us a ton of time, but I love the contrast of the white railings. If you don’t have access to a paint sprayer, then I recommend using RockSolid 6X Deck Coat for railings and vertical surfaces.
Now on to the best part, the before-and-after photos!
This photo really shows the old hot tub wind break. It’s so nice to have that gone. The deck feels a lot more unified and open with the rest of the backyard now.


Doesn’t the railing look so good painted white? The whole deck looks so much more modern in the new color.


I definitely see us spending a lot more time out here now. The risk of slivers is gone and the whole space feels so fresh and clean.


This project took us a lot longer than we anticipated, but we have a huge deck (700+ square feet) and it really was in awful shape. We spent about five Saturdays and a few weeknights working on it. Not going to lie… it was exhausting!
But the payoff is pretty great. We love our “new” deck! I’ll let you know how the finish holds up after it’s seen a harsh Idaho winter.
Seven years later, the deck needs to be refinished again. This product peeled really badly on us and will be really hard to remove in order to lay down something new. We plan to pour a concrete slab for the lower level and use Trex and vinyl railing for the upper portion. We’re hoping to do this project summer of 2025.
It’s hard to say if I’d recommend this product. It bought us seven years, which I appreciate. And I’m not sure the old deck was salvageable any other way. I guess I would say that if you just need to buy yourself some time with a really old deck that you plan to completely replace eventually, then this is a good product. Otherwise I don’t think I would use it.

Before beginning this project, please visit Rustoleum’s product FAQ pages. They have so many helpful tips, tricks and resources to help you have success with your deck refinishing project.

The deck was in such bad shape that we never wanted to hang out back there. Our big, beautiful backyard was one of the main reasons we purchased our home, so we knew putting time and effort into remodeling the deck was important to us.
Thank you to my friends at Rustolem for sponsoring this post. I was talking to them at a blogging conference and they told me about these products and I knew they were the perfect fit for our old, sad deck.
If you are in a similar situation, let me walk you through the process of restoring an old deck.
Materials Needed
- Power Washer (we rented ours from Home Depot)
- Deck and Patio Cleaner
- Zinsser Bulls Eye Spray Primer
- Deck Start Wood Primer
- 20X Deck Resurfacer Roller Cover
- RockSolid 20X Deck Resurfacer
Step 1: Repair any rotted or broken wood. We had to completely replace our stairs because the stringers were broken.
We also replaced several deck boards and a few of the side pieces that were rotted through. Our deck used to house a hot tub and had a little wind break fence around where the hot tub was placed. We decided to take it down to open up the whole space. You can see a bit of the old partition left in this photo:
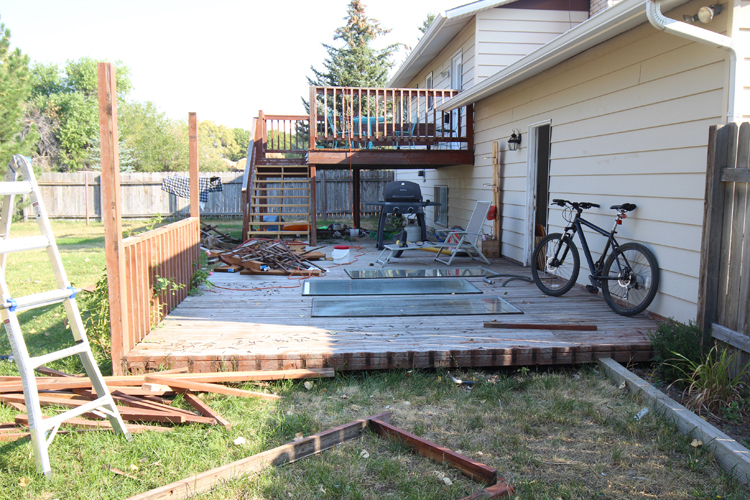
Step 2: Power wash the deck. We sprayed in between deck boards first, then went back across the tops of the boards. I was shocked at what a difference power washing made. Suddenly our deck didn’t seem nearly as old. Look at the difference:
I also thought this was the most fun part of this project. Power washing is oddly satisfying.
Step 3: Scrub the entire deck with RockSolid Deck and Patio Cleaner.
Mix the cleaner with water in a Home Depot bucket (the directions are on the package), then pour the solution across the deck and use an outdoor push broom to scrub the solution into the wood. Rinse with clean water.
Step 4: Once the wood is dry, spray all of the exposed nail heads with Zinsser Primer to protect them from rusting. This only works because the top coat is opaque, so the white primer will disappear later. Obviously you wouldn’t want to do this if you’re using a semi-transparent stain.

Step 5: Coat the deck with Deck Start Wood Primer. This product works with any solid top coat and simplifies prep work because you don’t have to strip off the old stain. This is a crucial step to promoting top coat adhesion, so don’t skip it! Also, just a funny little side note. This stuff reminded me so much of school glue. It goes on white and dries clear and it even kind of smells like school glue!
Step 6: Apply RockSolid 20X Deck Resurfacer to horizontal surfaces. This special coating is designed to fill in cracks in the wood and seal in splinters. It is VERY THICK… like “really good milkshake” thick.
We chose the color “Brownstone” which is a nice greige color. If I were to do it again, I would have picked “Winchester” which is basically the same tone, but a few shades darker. This is just a personal preference… I think the higher contrast would have looked sharp on our particular house. You can see a whole list of the available color options on the Rustoleum website.
Here are some things you need to know about applying 20X Deck Resurfacer:
- The product must be stirred before application using a drill paddle attachment.
- Because it is so thick, the 20X requires the use of a special roller cover designed to spread just the right amount of paint onto the deck.
- Use a paintbrush to cut in edges and paint between boards first, then go over everything with the roller.
- The color between different containers can vary slightly, so if you need more than one bucket, mix them together before application to avoid problems with color variation.
- You MUST be on “drip patrol” for about 20 minutes after applying the product. Because it’s so thick, it can leave huge drips, especially along edges. Walk around with a paint brush and wipe away any drips and keep checking for more drips as the paint dries!
- 20X cleans up with soap and water, which makes life so much easier!
We chose to spray our deck railing with a high quality exterior latex paint and my trusty paint sprayer because we knew that brushing on the paint would have taken FOR-EV-ER. It was the best choice we made in this entire project. Not only did it save us a ton of time, but I love the contrast of the white railings. If you don’t have access to a paint sprayer, then I recommend using RockSolid 6X Deck Coat for railings and vertical surfaces.
Now on to the best part, the before-and-after photos!
This photo really shows the old hot tub wind break. It’s so nice to have that gone. The deck feels a lot more unified and open with the rest of the backyard now.
Doesn’t the railing look so good painted white? The whole deck looks so much more modern in the new color.
I definitely see us spending a lot more time out here now. The risk of slivers is gone and the whole space feels so fresh and clean.
This project took us a lot longer than we anticipated, but we have a huge deck (700+ square feet) and it really was in awful shape. We spent about five Saturdays and a few weeknights working on it. Not going to lie… it was exhausting!
But the payoff is pretty great. We love our “new” deck! I’ll let you know how the finish holds up after it’s seen a harsh Idaho winter.
DECK UPDATE 2024
Seven years later, the deck needs to be refinished again. This product peeled really badly on us and will be really hard to remove in order to lay down something new. We plan to pour a concrete slab for the lower level and use Trex and vinyl railing for the upper portion. We’re hoping to do this project summer of 2025.
It’s hard to say if I’d recommend this product. It bought us seven years, which I appreciate. And I’m not sure the old deck was salvageable any other way. I guess I would say that if you just need to buy yourself some time with a really old deck that you plan to completely replace eventually, then this is a good product. Otherwise I don’t think I would use it.
Before beginning this project, please visit Rustoleum’s product FAQ pages. They have so many helpful tips, tricks and resources to help you have success with your deck refinishing project.